Showing posts with label G's food. Show all posts

01 January 2014

Just ducky

Have had a duck in the freezer for months so I've been waiting for an opportunity to give it its due. Over the holidays I got it in my mind that a roast duck dinner was inevitable and even necessary but as I was flying solo for much of it, I never got around to it. One person can only consume so much duck. So with amorphous New Year's Eve plans in place, I figured this would be a great time to prepare a roast dinner for J and myself.

It has been years since I actually roasted a duck and the last time I had a lot of trouble finding a recipe that didn't have Asian flavours -- in the end, I had to use one from a hunting magazine that began with "firstly, remove any buckshot." My foray onto the internet proved much more fulfilling this time around and I settled upon this Christmas (I know that was so last week!) roast duck recipe from Jamie Oliver. I had everything required on hand in the house so didn't even have to go shopping.


It takes time but is not all that complicated and it turned out even better than could be expected. Roast duck with potatoes roasted in duck fat is not a light meal that you'd want to eat very often but for a special occasion, it really hit the mark. The gravy (which I made gluten free for J) made with port wine was luscious and brought the whole meal together.  Simply added a few steamed and dressed green beans (and a glass of bubbly) to the operation and we had an absolutely divine NYE dinner.


22 October 2013

Albondigas with a twist

For the many Sephardim that read this blog (and there are so many of you I can hardly count you all on my fingers), you'll be familiar with the traditional version of albondigas that we've been eating (and loving!) since we were all tiny. They're red, it's all about the tomato. Well tonight I went off the beaten path, well onto the somewhat beaten path of Mexican flavours that I've embraced and turned the blessed albondiga of my youth on its ear! Tonight's were green, that's verde, yes!

I had some tomatillos sitting in the fridge that I had picked up at a farmers' market a while ago. I needed to use them. I was not willing to let those beauties go to waste but I needed something one step up from salsa verde, because that does not a dinner make. So a little searching and a little cobbling together and here's what I came up with.


Albondigas verde
  • 1-2 pounds of ground beef
  • 10 or so tomatillos
  • 2 poblano peppers or a couple of jalapenos
  • 3 cloves of garlic
  • 1 big white onion (1/2 cut into chunks, 1/4 chopped super finely)
  • 1/2 cup of chopped cilantro
  • 2 tbsp of uncooked rice
  • few tablespoons of oil
  • salt 
  • 1 or 2 eggs
Clean and remove the husks from the tomatillos and put them in a pot of water to boil for about 15 min until they turn a little yellowish. If using jalepenos, boil with the tomatillos and remove seeds etc once cooked.. Once ready, drain the water from the pot.

Roast the poblano peppers (either under the broiler or over the flame of a gas stove) until they are fairly charred. Put in a plastic bag and let sweat for about 10 minutes so the skin will be easy to get off. Clean the skin off, remove the seeds and rinse the pepper to get all the black bits and seeds off.  

Chuck the cooked tomatillos, poblano peppers/jalapenos, chunks of onions, cilantro, garlic, and about a cup of water into a blender and blend until it is a very nice green colour.

To make the meatballs, mix the eggs, ground beef, finely chopped onion, rice and a couple of pinches of salt into a bowl and then form into walnut sized balls. Not too tiny but not big either.

In a pot large enough to fit the balls essentially in one layer, add the oil and let it get hot. Pour the tomatillo mixture in (and enjoy the sizzle). Mix and let it come to the boil. You should add a bit of water to thin it out now (I used the blender and got all the rest of the tomatillo mixture out with the water). 

Once the sauce comes back to the boil, add the balls, turn down the heat, and let it simmer partially covered for 30 minutes. Add salt etc as required to taste.


I served this over pink rice and a little Mexican style salad with chopped onion, a few of the last stragglers from my tomato crop, chopped lettuce, and some chunks of avocado dressed simply wiht some lime juice, olive oil and a bit of salt.  They don't look all that fantastic in pictures but we're about flavour here, not looks!

29 July 2013

We are smokin'

I have a great desire for a smoker. But the reality is that it involves quite a bit of time and there is limited real estate in the backyard. So at this juncture, no smoker. That doesn't mean that I am not keen to  try smoking at home and we have bought a few things and I have read a lot about smoking in the oven etc. but not yet tried. 

Well in the spring I found these smoking bags at Lowe's. Emeril Lagasse promises from the packaging that I can make fabulous smoked foods with no hassle. As we have barely eaten at home in the last month, there's not been much time for experimentation. This weekend we spent mostly at home and with groceries in the fridge so I figured let's give the smoking bag a go. 

I grabbed a chicken breast from the freezer but sadly there was no dark meat, which I prefer. No worries- there was a cornish hen. Let's just ratchet up this experiment. I cut the little bird in half, seasoned it all with some thyme, oregano, garlic powder, salt and pepper and then just opened the foil envelope, popped the poultry in, and sealed it up. 

Apparently the bag has wood chips and stuff embedded into it. I heated up the bbq and stuck it in there on high for about 15 min and then medium for another 30. As the bag is sealed there's no way to know if there's magic or chaos going on inside. The backyard smelled like a smokehouse so I took that as a good sign. Took the bag off the heat and let it rest for 10 min or so then cut her open. Inside...some pretty freaking perfectly cooked and well smoked bird!!!

J made an awesome potato salad (and kindly used some parsley from the garden) and I made some green beans. All in all an very delicious experiment and a thrill to have a meal at home.

22 September 2012

Pickled jalepenos

My friend Jennifer gave me a whack of jalepeno peppers and since there was no chance of eating them all anytime soon, I decided to give the pickling a go.


I used a very basic pickling recipe and from a pound got two small and three medium-sized jars. More than enough to get anyone throught the winter.

Here's the recipe:
  • 1 pound jalepenos
  • 2 cups white vinegar
  • 2 cups filtered water
  • 2 tbsp pickling salt.
Slice the jalepenos into rounds and pack them into hot, cleaned jars.  Put the other ingredients together in a pot on the stove and simmer for about five minutes. Pour the hot brine over the peppers, clean the rims, and seal the jars.

Process in a canner or huge pot of boiling water for 10 minutes.

You're done.


03 September 2012

I am smokin' hot

I planted my first real vegetable garden this year. Started slow with just a few things but one of the most vibrant producers has been the cayenne pepper plants. And what is there to do with dozens of bright red peppers other than brew up some hot sauce? So I did.

The recipe is quite simple:

1 dozen cayenne peppers
2 heads of garlic
3/4 cup of vinegar
salt (which I just realized I forgot)

I had a lot of cayenne peppers and some little loco peppers that I also grew, so threw a few of those in the mix, and made 4x the recipe.

First cut off the stem, slit, and remove the seeds of each pepper. Please do this with gloves. And don't touch your eyes, nose, or mouth while you're doing the deed. The burn is fierce.

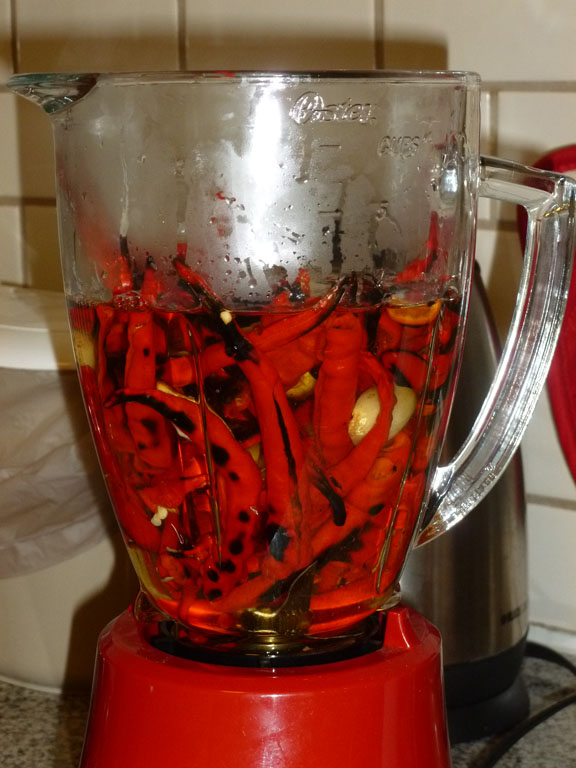
The traditional Tobasco Sauce has "aged" peppers but who's got time for that. So I figured I'd deepen the flavour by roasting the peppers a bit. I used my favourite Mexican style of dry roasting on the comal, but you can do it by broiling them in the oven until the skin turns a bit black. Some people suggest taking the skins off after the roasting but seriously, that's a bunch of fiddling around that takes up time I'll never get back. So I just tossed them, the garlic (which I also roasted but there's no need to), and the vinegar into the blender and wazzed it all up.

Once it's all lovely and liquidized, simmer the mix on the stove for about 20 minutes. At this point, the whole kitchen, if not house, will start smelling like hot sauce. There may be some burning eyes. It's all for a good cause.

Once the simmering of the flavours is done, run the whole thing through a sieve to clear out the pulp, seeds, and skin.


This, I would say is the time to add the salt, if you're not too busy forgetting to do it like I was.

You need to prepare some jars to put this lovely concotion in. I didn't have any traditional style bottles so I used small jam jars (125 ml each). They need to be washed out with boiling water and new lids prepared in boiling water. Once that's all ready, pour the sauce in, seal and you're ready to go with some smokin' hot sauce!


22 May 2012

Back in the saddle

Work has been busy. Life has been busy. What hasn't been busy is the kitchen. Well I had a day off today and had wanted to make this recipe that had been sitting on my desk for weeks, months even.  It really couldn't be easier: make some guacamole, pan fry a few scallops. I added the sauteed fiddleheads because it's the end of fiddlehead season and I hadn't had any yet. Yumm.


20 February 2012

Meringues with a kick

The pasilla chile softening on the comal is a traditional start to a Mexican meal. And next the next step, perhaps, would be grilling tomatoes, onions, and garlic to make the perfect base for a savoury sauce. Well not in this case. This was the start of dessert for last night's dinner. Part 1 of the pudding was to be chocolate-chile ice cream.

Next step is creating a chile and cream infusion as the base to the ice cream. Just steep the softened chile in the cream.  Then you waz it up in a blender, then strain out the bits of chile (which if  you've blended it well, there shouldn't be much of).

While that's all going on, there was chocolate being chopped. Using the good stuff makes a big difference. Then the chile infusion gets mixed together with this lovely chocolate and is well on its way to becoming the custard base for the ice cream.

Add the chile-chocolate-cream mixture to a bowl full of egg yolks and sugar. Now you're ready for cooking the custard.


The custard has to thicken over a double boiler so there's a bit of arm-building whisking action involved. Although it's a lot less arduous than say, making mayonnaise.  And because there's no shortage of steps in this ice cream making process, once it's all up to the right temperature and thickened up, then the custard has to be cooled. So stick it in an ice bath and whisk some more.


At this point, I was wondering if this whole process was ever going to end, but having an array of delicious ingredients, I cracked on with it. A little vanilla, some heavy cream, and a bit of chocolate liquer. Then into the ice cream maker it all goes.


Once this final step is complete, it can go into the freezer for a few hours or overnight to harden up and for the flavours to really marry together.

And since the ice cream only used the egg yolks, and I don't like to waste, I thought I'd try my hand at making some meringues. Last weekend I made a pavlova, which was very delicious but the meringue base was not quite right. So this time, I used the basic recipe for the Joy of Cooking. The trick to the nice stiff peaks: cream of tartar. Conveniently I had some in the pantry, so stiff ones all around.


My initial dessert plan had been to have the chocolate-chile ice cream with grilled pineapple, which I still made, but with the meringues (which I have to say came out pretty freaking perfectly), it was perhaps one of the best desserts I've ever put together. I gave myself quite a few pats on the back.

And, I'm also happy to report, J and our dinner guests enjoyed it. And that's reallly what all the time and effort is about, seeing the clean plates in front of everyone.

05 January 2012

Feel good food

I realized tonight that making a good meal, or at least one that I enjoy eating, makes me feel good about myself. So tonight's dinner was feel good food. I wll say that there's nothing bad about a meal that starts with this:

That is a bowl of delicious spices and chopped parsley that got turned into some beautiful beef kebabs that we had with a bit of rice, some Bick's pickles and some pickled beets that I whipped together just before Christmas. Here's the recipe. The flavours really hit the spot with me.

Ground beef kebabs
  • 1 pound of ground beef (or lamb if you're feeling so inclined)
  • 2/3 cup of chopped parsley
  • 1 small onion finely chopped
  • 2 tsp paprika
  • 1 tsp ground cumin
  • 1/2 tsp ground coriander
  • 1 tsp salt
  • 1/8 tsp chili powder
Get 6 to 8 skewers. If you're using bamboo ones, soak them in water. Basically put all the ingredients together in bowl and mix them up making sure the parsley and onion is all evenly distributed.  Then make 6 to 8 evenly sized balls. Go fire up the bbq. Take each ball roll it into a bit of a cylinder then put a skewer through it. Mold the meat onto the skewer by squeezing it a bit. Pop them on a med-heat bbq and cook for about 12 minutes turning them occasionally.

Take 'em off and serve right away with rice, pickles, and even some yogurt dip if you like.


01 August 2011

Tagine in a tagine

Our friends Joanna and Gary bought us a tagine as a housewarming gift. I have not used one although I'm very intrigued. As it required a bit of beyond the ordinary, the gift ended up sitting on the shelf for a few months. So Friday, I decided I would give it a go and found a recipe online that actually cooked it in a tagine -- versus a slow cooker -- so I was ready to rock.

So you can actually use certain tagines to cook in, rather than just serve in, and the one we were given was a cooker. But that didn't make me any less nervous about putting the clay bottom right on the gas. I was somewhat buoyed by the memory of seeing big clay pots sitting over gas and coal cookers in Mexico recently so I off I went. There were a few weird things, and I'm not sure if once it's been cured and used a few times that it will be different. But the main thing was that putting oil in the bottom, it got hot but wehn I put the chicken in to brown I didn't get much sizzle. There seemed to be quite a lot of liquid. So the chicken didn't brown but it didn't matter much. The whole event was quite fun and I must say that I deboned that chicken with quite some skill!!

Anyway everything gets chucked in there and then it boils way for a bit with the lid on and steam escaping through a little vent in the top.


The final product was very delicious although I will likely mess around with the spice mixture becaxuse that's what I do. It's got preserved lemon in it, which is classic, but I'm not so sure about it. Regular lemon may just do the job. The recipe I used also doesn't include any fruit, which is also classic, but I don't really like fruit in my food, so I was happy about that.


Served over some lovely couscous. It's a meal worthy of a king! Or at least two happy-go-lucky gals on a Friday night.

04 May 2011

I got the beets

I roasted a whole package of beets last week and it was really A LOT. So we made our regular and favourite beet salad the first night and then I didn't know what to do with the surfeit of leftovers. They sat in the fridge for a few days as I could not come up with another option but didn't want to toss 'em. So finally on Sunday I decided to make borscht. J said she was not keen on it but I wanted it and nothing else was going on in the kitchen on that dull and rainy afternoon.

I have not made it before so went to the bible - Joy of Cooking - to see what it had on offer in terms of recipes. There were a couple but neither seemed just right so I ended up doing a bit of a hybrid.

Now don't let the picture scare you, it was actually quite delicious and turns an excellent fuschsia colour when you stir in the sour cream. It also turned out to be totally vegetarian as somehow I ended up instead of buying regular veggie stock cubes getting ones that were veggie-beefy flavour. Anyway, it worked in this case as the stock needs to be, well, beefy. And it's quick.

G's roasted beet borscht
  • 3 small or one large roasted beet (make extra when you're doing them for something else), slivered (leave a few chunks for colour purposes)
  • 1/4 red onion, chopped
  • 4 cups of beef stock - chicken stock does not really have enough umph!
  • 1 potato, cubed
  • juice of about 1/3 of a lemon
  • sour cream and dill for garnish
  • salt and pepper to taste
Put the stock in a pot and bring to the boil then add the few chunks of beets, onion, and potato and simmer until the potato is mostly cooked. It should be a nice purply colour. At this point, you can take out the chunks of beet as they have done their work. Add the slivers of beet and the lemon juice then cook for about five more minutes. Taste and season to your liking then serve with a dollop of sour cream and dill.

It's easy peasy and a good hearty soup. I didn't even bother to brown the onions, they just cook up nicely in the stock and float around. I also don't add cabbage, carrots, or even peppers like some recipes. I was pretty pleased with how it came out. A do-over for sure.

25 April 2011

I've got green balls

Now you're reading this!!

So last year I wrote about making poblano matzoh balls but there were no pictures. Well I had to recover from my matzoh ball disaster of last week as well as wanting to try making the green balls again. Am happy to report that after a good weekend of cooking, I feeling like I'm moving away from the sense of disaster that had been haunting me in the kitchen recently. Anywho, I also have to get out the good camera, the phone camera is not really optimal - but it is easy.

So to make the green balls, first thing is to char the skin of the poblano, which is easily done over the burner of the gas stove.
Using this method, it didn't get quite as soft as when you char the skin under the broiler. So in order to soften it up so it's easy to mush, I just put it in the microwave for a couple of minutes. Then mushed it up, added to a regular mix of matzoh balls at the point just before you make the balls and put them on to boil.


I will say that I made perhaps one of the best batches ever of chicken soup and these green-tinted matzoh balls make a nice change. I will probably be making them every year and maybe next year even try some red ones made with another type of chile.

21 April 2011

The highs and lows of cooking for Pesach

It seems there's been a lot of highs and lows for me lately in the kitchen and Pesach was not to be passed over, so to speak, on this front.

My mom asked me to make a cake or some manner of sweetness for Monday's seder. I was happy to oblige and my search for an interesting and different option began. You'd be surprised by how few options there are out there on the internet and baking is just not something that I'm comfortable making up. Anyway, I ended up using a Nigella Lawson recipe from her book Feast for damp apple and almond cake. It worked out quite well (no pics, however) but would have probably been better if I'd had the right cake pan. But not bad for a first try.

This year, I also wanted to do something different than going out and buying dem coconut macaroons, jellied fruit slices, or Manischewitz kosher for Pesach chocolates. J bought a Bonnie Stern cookbook that had a few gems in it. Although her recipe did lead me astray on the issue of whether or not to stir the caramel as it cooked (you stir constantly btw), I did get a particularly tasty treat to share with friends and family.
Basically whip up some caramel - that's 1 cup of butter and 1 cup of brown sugar - then spread it over a few matzahs. Let it get all nice and bubbly, get it out the oven and sprinkle a bag of chocolate chips (kosher for passover, of course), wait five minutes and give it a nice schmear to cover it all up. Let it cool, which usually takes a few hours, then break it up into small pieces. Let the oohs and ahhs ensue as everyone enjoys the matzah crunch.


Oh yeah, so that was the high. The lowest of the low: matzah balls like golf balls. They were not a delight. I shall try to remedy that before the week is over. Following the instructions properly will likely help.

17 April 2011

The highs and lows now that we're cooking with gas

Having lived in the new house for a couple of months, we are still getting used to cooking with gas. For the most part, I love it. For instance, I've always wanted to make my own baba ghanouj but I like it really smokey and have had neither a bbq nor a gas stove . . . but that has now all changed. So the other day, I picked up some beautiful aubergines, eggplants, berenjena - whatever you may call them - and set to.

The most important part of the whole operation, according to Nigel Slater and I'm middle eastern cooks the world over, is charring the skins of the fruit so you get that awesome smokey taste. So basically I took the two eggplants that I had and put them right on the burner of the gas stove and charred the heck out of them until the skin was burnt and the flesh was all soft. And oh how fabulous the kitchen smelled.

Next step - put the piping hot fruits into a colander resting on a bowl. Once they've cooled a bit, peel the charred skin off and discard. During the process, your eggplants will be leeching some water, but you want to get rid of most of it because it's kind of bitter and who needs that! So you can either just sort of mush the flesh with a fork until you've got rid of most of the liquid or sort of chop it up a bit and then mush it. Either way, get as much liquid out as you can and discard it.

You now have a nice load of mushy eggplant. Add to this:
  • 3-4 tbsp tahina
  • 2 garlic cloves chopped as fine as you can
  • 3 tbsp olive oil
  • juice of one small or 1/2 of one large lemon
  • salt and pepper

Most of the recipes I read for this say you don't need to use a blender but depending on the quality of your eggplant, you may want to. I think mine may have either been a bit old or had some bruising because I got a couple of nasty hard bits that couldn't be mushed with just a fork. And getting little hard bits in your creamy dip is not pleasant, so if you need to, waz it up with the blender if you want to. Finish it off with a sprinkling of fresh chopped parsley.

I served it with some chicken grilled on the bbq after a bit of a greek marinade (lemon juice, olive oil, garlic, and oregano) as well as a green salad and rice.

So you'll see in the photo above some fluffy white rice and that brings me to one of the lows of cooking with gas. Now, you see, I have been cooking rice perfectly for many, many years. I took the knowledge passed down to me from my mother and others and then made it work for me (1 cup basmati rice, 2 cups water, pinch of salt and a drop of oil/2 tsps of tomato paste if you want. Bring water to boil. Add rice and bring back to boil. Turn down to low, cover, and cook for 17 minutes). My rice came out perfect every time. Every time. My rice mojo, however, is now lost. I've made mushy rice, I've made some absolutely charred rice, and I've made some passable but mediocre rice. I have not made perfect rice with this gas stove. So there is much to learn. For now, I'm tending more toward the potato!


17 January 2011

Just ducky

It's not your average work day dinner that I whipped up tonight but since I didn't have the enthusiasm for it last night, I had to do tonight. Sometimes I enjoy the frenetic-everything-has-to-be-cooked-at-the-same-time madness and tonight was one of those nights. I've been having a hankering for duck for quite a few weeks and finally last week picked up a nice magret duck breast at the St. Lawrence Market. Popped it in the freezer and then took it out on Sunday with a plan to make a nice meal for both of us. That planned got a bit scuppered by events of the day, and as mentioned, my enthusiasm for the cooking had waned.

So it had to be eaten tonight, so I got to it. Pan fried duck breast in a red wine and mushroom reduction (based somewhat on this recipe). I get a kick out of making the diamond shapes in the fat of the duck breast and searing it. And then continuing the low-fat meal prep, I used the duck fat to pan fry some gnocchi, which was what J had a hankering for. They come out spectacularly. Even using the packaged ones, they were crispy on the outside and soft and fluffy inside. Nice!!! Along with that, we roasted some broccoli.


There were pots and pans and all manner of things flying about the kitchen. What fun! And a friggin' gourmet feast for a Monday night people!

10 January 2011

Now this is how you use up turkey leftovers

We had a lot of turkey over the various holidays in Q4 of 2010 (see how all-business I've become). Each time there was a bit left over that I ensured did not go to waste. Almost all the extra meat was shredded, bagged, labelled, and put in the freezer. Carcasses, vegetables and other goodies were turned into stock that was also saved in one or two cup servings in ziploc bags and also put in the freezer. The stock has many, many, many uses!

So it had been some time since I'd rustled up some Mexican food and over the weekend, I had a hankering. Also wanting to use up some of what we had in the freezer before our move, I thought I would do something with both the shredded turkey and some stock. I really enjoy the chicken tacos with chicken tinga so thought I'd adjust a recipe from my Mexican Home Cooking course and use turkey to make some tinga. It used some of the chipotle en conserva that I made last summer, and I added some tomatoes, herbs and other jazz and voila!

So, of course, this also meant a quick trip to the market to get a few goodies like my new favourite fresh tortillas, some queso fresco, etc. etc. Put that all together and you have a totally delicious turkey taco (with a not so excellent picture to illustrate the point).

While at cooking school, we also had this fantastic soup of poblano peppers (crema de chile poblano), which I really wanted to make. It was a cold day and soup was going to warm the soul. So put that together as well - really easy and relatively fast except for the charring and cleaning of the peppers - and I used my homemade turkey stock as the base. The soup was so smooth, creamy, a slight hint of spice and just generally absolutely delicious.


Not only was the food great but we also got to use this spectacular tortilla warmer that J's family gave me. Put eight tortillas in it in the microwave for a minute and you've got steaming hot flatbreads that stay hot! Yeah.

And the other most awesome thing for those on the Weight Watchers: low points, ahoy. Four tacos, with a bit of queso fresco, some salad, a bit of crema, and a plate of soup is only about 12 points. That's a big feed for not too many of the Points Plus!

06 December 2010

Finally a shrimp taco

I have been trying to whip up some shrimp tacos for weeks. For a variety of reasons, including not really cooking much in the last two weeks, there has been no shrimp tacos. But tonight, the stars aligned and shrimp tacos there were!


It was a total shortcut day though! So we had a bag of pre-cooked, peeled, deveined shrimp in the freezer that we got on super special somewhere. Anyway, they were easy to deal with and I just defrosted in a bit of water, pulled the tails off and we were ready to roll on that front. Whipped a cup of frozen tomato-chipotle sauce out of the freezer, put it in the frying pan and brought it to the boil. Popped the shrimp in there for a few minutes and that was all ready.

Had a couple of avocados in the fridge and had picked up a few tomatillos at the store yesterday, so whipped up a bit of a tomatillo-avocacdo salsa. Not my usual as the garlic, onions, and tomatillos all went in raw instead of with a bit of a roast on as usual. I just did not have the energy. There was also no cilantro around, so that got left out and my fresh jalapenos had gone mouldy (did I mention about not being in the kitchen much lately!) Anyway used a couple of the tiny dried chiles that I bought in Israel and that are mighty potent.

Served it all with some green rice (regular rice cooked with a tomatillo boullion cube in the water) and fresh corn tortillas purchased in the market over the weekend. Delicious and spicy!

Now for the final cleanup to get the kitchen back to that not-lived-in look that the realtors like so much!

11 November 2010

Ancho-guajillo enchilada sauce

I love guajillo chiles because they are such a deep, robust red and colour whatever you add them to so beautifully. I had also just bought some anchos because I like them and realized I'd not cooked with them in some time. So sitting in the kitchen I had both and wanted to use them to whip up a dinner for some old friends who were visiting from England and to whom I had promised Mexican food.


It took some searching but i finally found a recipe that gave me some guidance on putting together an ancho-guajillo enchilada sauce. It was a bit of work but did yield a rich red sauce that wasn't too spicy.

Ancho-guajillo enchilada sauce
  • 3-4 each of guajillo and ancho chiles
  • 1 med. onion quartered
  • 4 cloves of garlic
  • 1 tbsp ground cumin
  • 1.5 tsp ground coriander
  • 0.5 tbsp dried oregano (preferably Mexican)
  • 2 tbsp olive oil
  • 2.5-3 cups canned tomatoes
  • 1 cup chicken stock
  • salt and pepper
Remove the stems and seeds from the chiles. Soften the chiles by first roasting them for 10 to 15 seconds on each side on the comal or a hot, dry frying pan. Then pop them into a small pot of boiling water while you do the rest of the preparations. Once they are soft, put them in a blender.

Dry roast the garlic cloves and onion on the comal. Peel and add to a blender. Also put the tomatoes in the blender.

If you have whole spices, it's best to use them and grind them up just before you need them. If you have pre-ground, that's fine too. Add the cumin, coriander, and oregano also to the blender.

Add one cup of liquid to the blender (can be 1 cup of chicken stock or a combo of chicken stock and some of the chile water. The more chile water you use, the hotter your sauce will be). Puree until quite smooth.

Sieve the tomato/chile mixture into a bowl, using a wooden spoon to push as much liquid through the seive as you can. You should be left with some bits of skin and seeds once you've got all your sauce through. Just toss that stuff.

Heat the oil in a medium pot and add the tomato/chile mixture so you get some sizzle. Reduce heat and cook, stirring occasionally, for about 15 minutes. The sauce should become a deeper red and still be quite runny. If it gets a bit too thick add some water or chicken stock to thin it out. Once it's all nice, you can go ahead and make your enchiladas.

We used left-over turkey that we had frozen after Thanksgiving. Mix it all up with some of the enchilada sauce so it's covered but not too saucy. I also didn't have the usual corn tortillas at home but had seen someone at the Brick Works market making them that morning so ordered up a dozen from her. They were good but at $1 a tortilla, not really the most cost-effective way to go! Basically once you've got the meat sauced up, just dip each tortilla in the sauce to make it soft, put a spoonful of meat inside, roll it up and place in a baking dish. Once you've got the baking dish full of rolls, cover with the rest of the sauche and top it with cheese (I used queso fresco, which I think is great but it doesn't get all melty like some other types of cheeses). Bake at 350F for about 30 minutes.

30 October 2010

oh that versatile sweet potato

The end of the season with our CSA box yielded quite a lot of sweet potatoes and never one to pass up a challenge of finding a new use for whatever we have in plenty, I thought I'd try a sweet potato biscuit. J had read a recipe for one in one of the many food mags she gets but after a lengthy search, we could not find it so I turned to the trusty internet and voila, Martha Stewart had a recipe.

I have never really made biscuits from scratch before but I was determined. So on a Saturday morning before heading out to the Brick Works market to meet some friends, I got busy in the kitchen. While they did taste really good - not to greasy and not to potatoey - they were not as fluffy as Ms. Stewart's appear in the picture on the recipe page. Nonetheless, throw some sweet butter on those babies right after you take them out of the oven and they are quite heavenly.


This picture is terrible - they did come out in a relatively nice golden colour - who knows what was going on with the lights and the camera on this one!

22 October 2010

Oh what a beautiful cupcake

J really wanted red velvet cupcakes for her birthday, so who am I to say no even if it's way out of my comfort zone to make 'em.

I used the recipe from the Hummingbird Cafe cookbook, which was a present from a friend for my birthday. I followed the instructions religiously but was worried the batter was too dense. Same deal with the cream cheese frosting, which didn't look like it was coming together. But it all worked out well and the cupcakes were delicious. My frosting job wasn't too professional but as they say, it's what's inside that counts.

10 October 2010

A touch of the south

It is Thanksgiving here this weekend and this house was full of sweet potatoes, so what to do but make something that I've not done before. Sweet potato pie rang my bell as it has that bit of the south that I find attractive!!

Once again I lazed out by using pre-made pie crust but that is life, man! The filling was actually really easy to make though. Boil up some sweet potatoes then mash them up with butter, loads of sugar, some evaporated milk, nutmeg, cinnamon, and eggs. Pour the filling in the shell and pop it ij the oven for an hour or so. It made the apartment smell like heaven. Haven't eaten it yet though so let's hope it's taste and wonderful as it smells.

LinkWithin

Related Posts with Thumbnails